The UofL activated the Syndetic Solutions plug-ins in the catalogue earlier today.
What this means is that when you perform a search (Advanced or Basic Keyword), the resulting titles might display a small picture of the book. When you click on the image, a new frame opens in the OPAC and allows you to browse additional information about the title. Information that you might find includes: abstract/summary, author notes, larger cover image, reviews, and table of contents. The Syndetic Solutions information is available in the aforementioned results lists or at the bibliographic level of a title.
The spell checker feature has yet to be installed.
Once all updates are complete and the bugs worked out, then I will post an announcement about the new features.
Thursday, May 31, 2007
Tuesday, May 29, 2007
WebPAC Pro Updates
Yesterday the initial upgrading of the OPAC to WebPAC Pro was initiated. The enhanced search algorithm and lengthier results list (from 12 to 50 per page ) were activated. Additionally, the brief citation was also activated. With the activation of the brief citation, a user will no longer have to enter a record before determining where it is located or if it is available.
There will be more enhancements to come over the next week. Things such as a spell checker and the Syndetic Solutions plug-ins will add further user convenience.
There will be more enhancements to come over the next week. Things such as a spell checker and the Syndetic Solutions plug-ins will add further user convenience.
Monday, May 28, 2007
Patron Uploads for Relais
Grant will be working on creating scripts that will parse data from the library system's patron database to conform to Relais's XML format. He does not anticipate a great deal of difficulty in mapping the metadata fields, so hopefully we will able to upload data in the next week or two. [Hmmm... I am sure I have said this before.]
Once the scripts are established, we should be able to upload records to Relais on a regular basis with little or no difficulty.
Once the scripts are established, we should be able to upload records to Relais on a regular basis with little or no difficulty.
Thursday, May 24, 2007
AAQ - Community Memberships/Priveleges
Hooray! An easy AAQ...
Hello and thank you for using the “Ask A Question” service.
Your question is: What are requirements for use of the college library and take-out privileges?
Currently the Vera Bracken (Medicine Hat) and Brooks Campus Libraries do not have a membership fee for community patrons. To become a registered patron with borrowing privileges, you need to see the Circulation Desk and present legal photo identification (i.e., driver’s license, etc.) with a local address (Medicine Hat or Brooks).
Community members have near equivalent borrowing privileges to staff and students. You can borrow most items with the notable exceptions of current periodicals, Curriculum (Education) Collection materials, and Reference Collection materials. Other notable privileges that you do not have include access to online databases (from home) and The Alberta Library (TAL) Card. For more information about TAL Cards, go to: http://www.thealbertalibrary.ab.ca/viewPosting.asp?postingID=16.
Books (Circulating and Paperbacks Collections) can be borrowed for three weeks and renewed twice more for three weeks if there is no hold placed on the item. This gives you up to 9 weeks with any book. Audiovisual and Periodical Back Issues can be borrowed for one week at a time and renewed twice more for one week – so you can have those items for a maximum of 3 weeks if no hold is placed on the item.
If you need further information about Medicine Hat College Library Services, visit our website at: http://www.mhc.ab.ca/library/. For information about the Medicine Hat Public Library, visit their website at: http://www.mhpl.info/.
Thank you again for using the “Ask A Question” service. If you need more help, please use the service again or see the Information Desk in the Vera Bracken Library (Local Phone #: (403) 529-3867); Toll Free Phone #: 1-866-282-8394,Ext. 3867).
AAQ#: 31853
Tuesday, May 22, 2007
Glossary of Abbreviations Added
I have decided to eliminate the use of parenthesis to show abbreviations for certain terms that will be used repeatedly in this blog (e.g., Ask A Question (AAQ), etc.). To make it easier for myself (and perhaps any readers) to understand those abbreviations, I will be building a Glossary of Abbreviations in the right-hand column that match abbreviations with their corresponding phrases.
Saturday, May 19, 2007
Old with the Old, In with the New (OPAC)
Well, the bulk of the refreshed OPAC has been completed and pushed to the live web server. There will be a few anomalies - such as blue buttons at the record level, but the UofL will be fixing that when they post their revisions later this week.
With any luck we will make a smooth transition to III's WebPAC Pro later this week. In the following week, the Syndetic Solutions enhancements should also come online.
Some screens captures of the before and after versions of the OPAC are shown below.
Old OPAC homepage:

New OPAC homepage:

Old OPAC Record Entry:

New OPAC Record Entry:

Wednesday, May 16, 2007
OPAC Update
The online public access catalogue (OPAC) is set for upgrading near the end of this month. Our partners at the University of Lethbridge (UofL) have submitted a work request to Innovative Interfaces (III) to have the OPAC upgraded to the WebPAC Pro version that will be pushed to the live server soon.
What can we expect to see in this new version: a greater implementation of cascading style sheets (CSS), a spell checker, an improved search algorithm, enhanced results lists, and preferred/saved search functionality. This upgrade will also set the stage for greater functionality of the OPAC server for future web standards.
My biggest join was deleting the image files associated with the previous OPAC on the staging server. I was able to delete more than 70 graphic files associated with the previous OPAC. Once the new OPAC is functional, I will be down to managing 3 graphic files - one for each of our two libraries' banners and a third for the Vera Bracken Library collections layout.
WebPAC Pro, with its new functionality and structure, promises to be a tremendous upgrade from the previous OPAC.
Monday, May 14, 2007
Filling Printer Trays
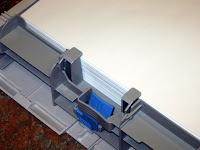
I have sent this e-mail twice before, but I wanted to post this on my blog for posterity's sake. When loading the drop-in printer (or any other), do not fill it beyond its limit. Printers have retaining clips that specify how much any given tray can hold. The paper should not rest loosely above the retaining clips at the back of the tray; the loose paper can create some ferocious jams that could potentially damage the rollers.
View the examples that follow:
GOOD (click image to enlarge):
BAD (click image to enlarge):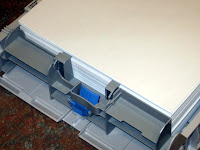
Additional tips for loading paper trays:
View the examples that follow:
GOOD (click image to enlarge):

BAD (click image to enlarge):

Additional tips for loading paper trays:
- Do not shove a whole sheaf in at once. Add paper in smaller amounts until the tray is full.
- Feather the paper (i.e., pinch one side and have your thumb flip through the other loose side). Feathering will keep the paper of sticking together as it feeds through the printer.
- Do not let patrons load specialized paper in the trays. There is no guarantee that another print job will not be processed between the time they load their paper and the time they actually print. Specialized printing (including legal sized) should be done via the manual feed tray. [To do this, in the Print window select: Properties [button] > Paper/Quality tab [in new window] > select: Manual Feed ... [under: Source is: drop box] > OK [button; closes window] > OK [button; to print] > load manual feed tray to complete. This process is similar on most laser printers with multiple feed trays.]
Sunday, May 13, 2007
Why the Evil Monkey?
For those of you that are perplexed by the Evil Monkey in my office, you can discover its relevance to pop culture from the following montage of clips from the Family Guy cartoon:
[NOTE: Press the play button, otherwise you will be redirected to the clip's YouTube page.]
The Evil Monkey in my office that accompanies the Deluxe Nancy Pearl Librarian Action Figure: [NOTE: Click image for a larger version.]

[NOTE: Press the play button, otherwise you will be redirected to the clip's YouTube page.]
The Evil Monkey in my office that accompanies the Deluxe Nancy Pearl Librarian Action Figure: [NOTE: Click image for a larger version.]

Wednesday, May 9, 2007
Ask A Question - WiFi Configuration
Here is the latest Ask A Question (AAQ) that I answered:
Hello and thank you for using the “Ask A Question” service.
Your question is: “How does one configure a wireless modum [sic. modem] to a mobile Notebook”? This is not a question that can easily be answered. For this question, we will assume that you are using a Windows-based computer (since they comprise 92-97% of the world market) with a built-in WiFi card (available in most computers under 3 years old).
There are many types of computer configurations that employ various hardware and software schemes, and just as many wireless network hardware and software schemes. Another consideration is whether you are referring to a WiFi connection that employs the IEEE 802.11 a/b/g/n standards of accessing a wireless local area network (LAN) or if you mean a wireless modem connection (those connections that are made through conventional cellular phone networks). The latter of the two mentioned methods is becoming more common as cellular providers now have specialized cards or phones that allow you to access cellular modem networks. It must be kept in mind that the following description is merely one way (and arguably the easiest) of establishing a standard WiFi connection (IEEE 802.11 a/b/g/n). We will not consider Bluetooth connectivity, since it is impractical/uncommon for Web browsing and e-mail access over a LAN.
If you are connecting by means of the WiFi access method to an LAN, we can address an easy method via Windows XP. That method would be to: (a) ensure that the wireless card is on; (b) look for an icon in your Task Bar’s tool tray that looks like a computer with three arcs radiating from it (it will appear with a red “x” if no connection is established (the “x” will disappear once a connection is established) – right click on this icon and select “View Available Wireless Networks”; (c) in the “Wireless Network Connection” window [that should have opened], select the “Refresh network list” option in the left-hand column; (d) select the wireless network that you want to connect to from the “Choose a wireless network” pane of the window, and click the “Connect” button. You should be prompted to login to the network (if encryption is available) or be given a warning that the network is unsecured (from a network where encryption is not available). Once the connection is established, the network that you selected to connect to should be displayed in the “Choose a wireless network” pane with its associated signal strength. You should now be able to peruse the Web or retrieve e-mail as desired. Select the “Disconnect” button (in the “Wireless Network Connection” window) when you want to terminate the connection.
If you cannot find the icon in the tool tray, you can view available WiFi connections by going to: Start (Task Bar; remembering to turn the WiFi card on beforehand) > All Programs > Accessories > Communications > Network Connections [opens the “Network Connections” window]. Double click on the “Wireless Network Connection” icon that will open the “Wireless Network Connection” window. Proceed from step (c) in the previous paragraph to establish the connection.
This was one simple method of connecting using Windows’s built-in tools. Some laptops will provide additional proprietary vendor tools for establishing WiFi connections. If you cannot establish a connection, consult with your owner’s manual or use the vendor’s customer service support line. If you are using a cellular-based network to establish your connection, consult with the owner’s manual or the cellular provider’s support services.
There might be many reasons why you might have difficulty accessing a wireless network. Some of those reasons include: (a) password protection (WEP or WPA encryption will prevent you from having unfettered access to a network); (b) weak signal or signal interference; (c) incompatible standards; (d) unregistered Media Access Control (MAC) address – some networks require that you register you computer’s unique identity with them prior to connecting, even if you have a username and password set; and/or (e) network firewalls might also restrict access. These are some of the cases that you might encounter.
Macs (Apple computers) connect in a similar fashion though it varies from Mac OS X.1-4. Consult the manuals that are provided with your Mac to establish a WiFi connection. The manuals are generally very easy to navigate and understand.
Whether you are using a Mac, Windows, or Linux-based machine, consult with the owner’s manuals or the operating system’s built-in help pages. Additional service should be provided by your computer’s retailer or the vendor. For further resources, consider consulting your local library’s online catalogue and use terms such as: computer, pc, windows, apple, macintosh, linux, mac(s); and pair them with terms such as: wifi, “network connection(s)”, “wireless networks”, etc. You will locate many basic and advanced resources that deal with the subject of establishing wireless connections from your laptop computer. You can find the Vera Bracken Library’s online catalogue at: http://eureka.uleth.ca/search~S2.
Monday, May 7, 2007
OPAC & Relais ILL Updates
I am currently working on the online public access catalogue (OPAC) updates for both the Vera Bracken Library and Brooks Campus Libraries. I anticipate completing this project by the end of this week. Hopefully our partners at the U of L will be ready to upgrade the online catalogue to the WebPAC Pro module.
WebPAC Pro will include nifty new features for patron such as: a spell checker and preferred/saved searches.
You can view the Vera Bracken & Brooks Campus Libraries' shared catalogue at: http://eureka.uleth.ca:2082/search~S2; and the Brooks Campus Library catalogue is at: http://eureka.uleth.ca:2082/search~S3. Please be aware that each site can only be accessed from on either of Medicine Hat College's campuses (Medicine Hat or Brooks) or the University of Lethbridge.
Upon completion of this project, I will be devoting the better portion of my time to the Relais interlibrary loan implementation - Relais is intended to replace our current interlibrary loan software that is part of the Innovative Interfaces Millennium library system. Hopefully both projects will be complete by the end of this month.
Thursday, May 3, 2007
PowerPoint Handout Completed
A long last, I finished the revisions to the PowerPoint 2003 Basics handout. The revision includes new sections such as: Before You Start, Interface Elements, Additional Resources, and Purchasing advise.
This handout can be download in PDF or Word 2003 formats at: http://www.mhc.ab.ca/library/howtoguides.html. Print copies will be available in the library shortly.
This handout can be download in PDF or Word 2003 formats at: http://www.mhc.ab.ca/library/howtoguides.html. Print copies will be available in the library shortly.
Tuesday, May 1, 2007
Ask A Question - Fill in the Blanks
One of my duties in the library includes participating in The Albert Library's Ask A Question service. From time to time I will post some of the questions that I have answered over the last three years. My latest response to a query is as follows:
Hello and thank you for using the “Ask A Question” service.
Your “question” is: fill in the blank _____ drowning victims may struggle on the surface for a short period before submerging, while a ______ drowning victims can slip quickly and quietly beneath the surface. Though this is not a formal question, we will attempt to fill in the blanks to
the best of our understanding.
Though there are many classes/types of drowning victims, I believe the American Red Cross’s “Lifeguarding Today” manual (Call Number: GV 838.72 L53 1995 in the Vera Bracken Library’s Circulating Collection) has the most suitable answer for this instance. Though this is an older text, it identifies two types of drowning victims, which are: (a) the active drowning victim, and (b) the passive drowning victim.
The active drowning victim is defined as: “A person exhibiting universal behavior that includes struggling at the surface for 20 to 60 seconds before submerging.” While the passive drowning victim is defined as: “A face-down unconscious victim, submerged or near the surface.”
So your fill in the blank might read as: ACTIVE drowning victims may struggle on the surface for a short period before submerging, while PASSIVE drowning victims can slip quickly and quietly beneath the surface.
As we previously mentioned, this answer is from an older text, so the terminology might have changed. Additionally, terminology might differ from lifesaving-system to lifesaving-system, or country-to-country. We suggest that you consult a newer text from your local library/recreation
centre, or contact a local swimming pool and consult with a lifeguard.
Thank you again for using the “Ask A Question” service. If you need more help, please use the service again or see the Information Desk in the Medicine Hat College Library (phone #: (403) 529-3867).
Subscribe to:
Posts (Atom)